Introducer Sheath

INSTRUCTIONS FOR USE

Device description

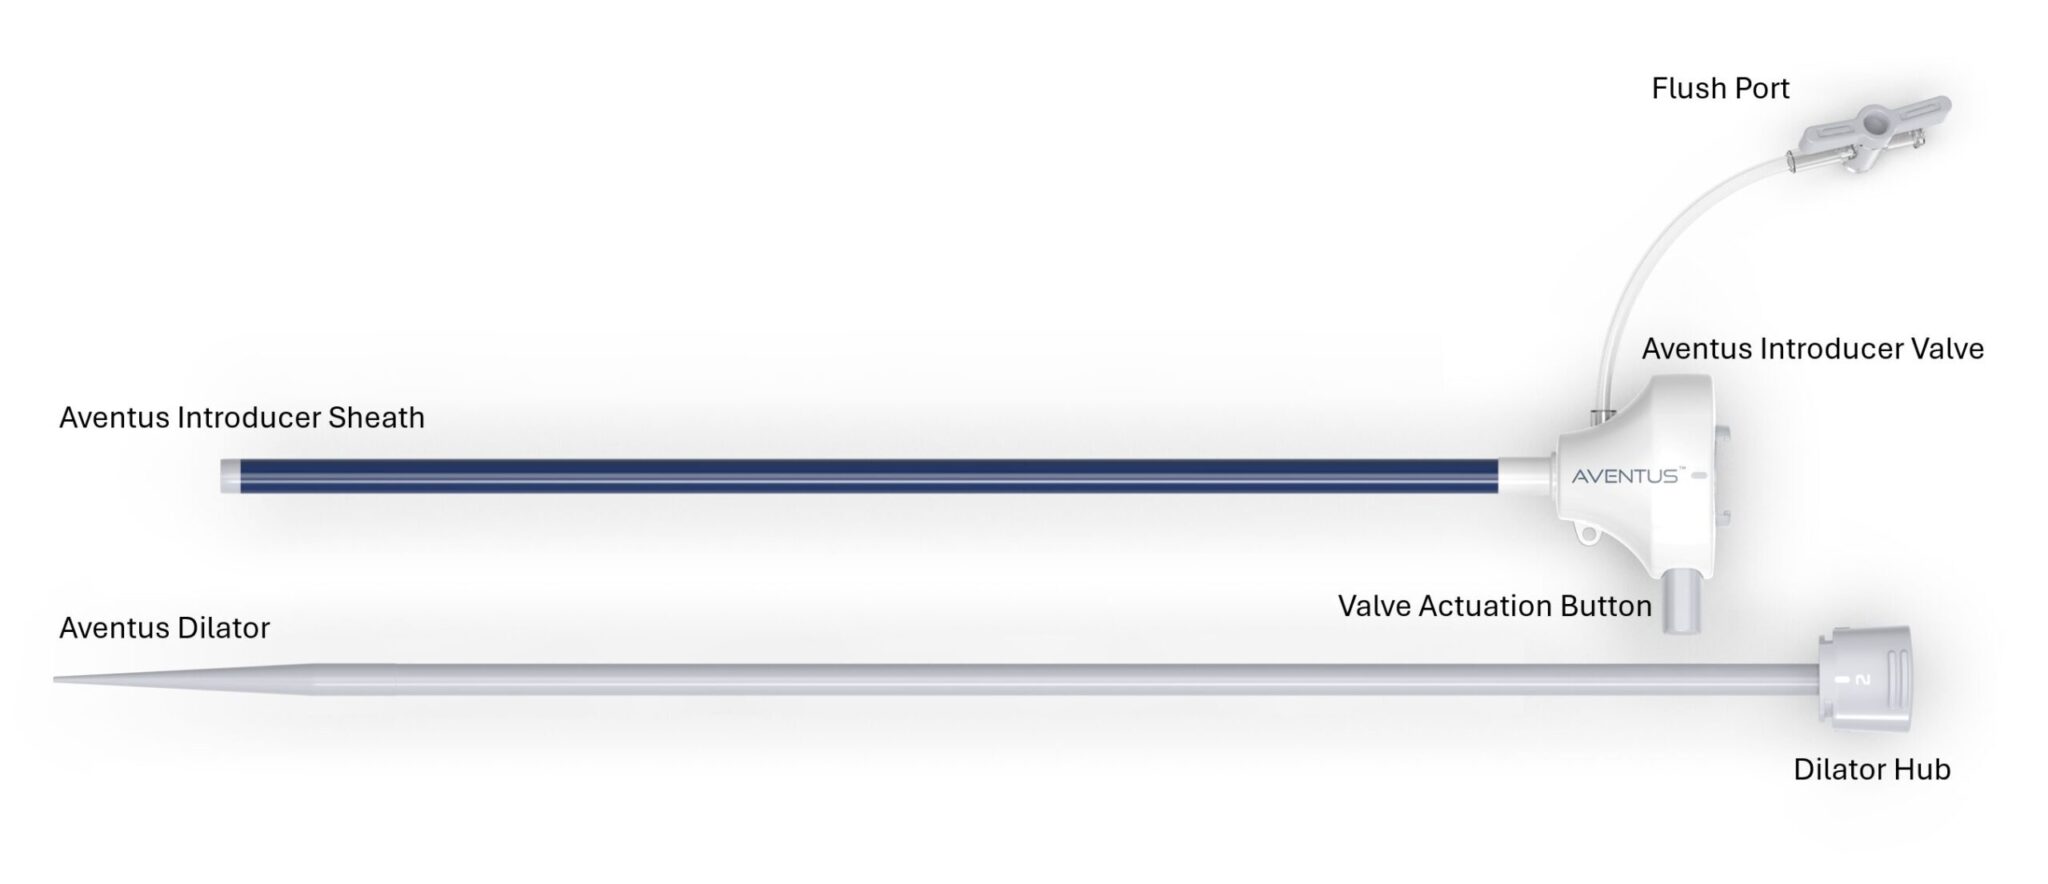
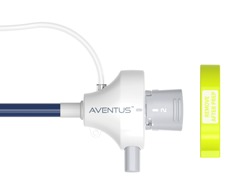
The Aventus Introducer Sheathis sterile, single-use introducer sheath designed for use in the peripheral vasculature.The Aventus Introducer Sheath consists ofa single lumen catheterwith hydrophilic coating, integrated hemostasis valve, flush tubing with a stopcock and a dilator with a locking hub (Figure 1).

Figure 1 — Aventus Introducer Sheath and Dilator

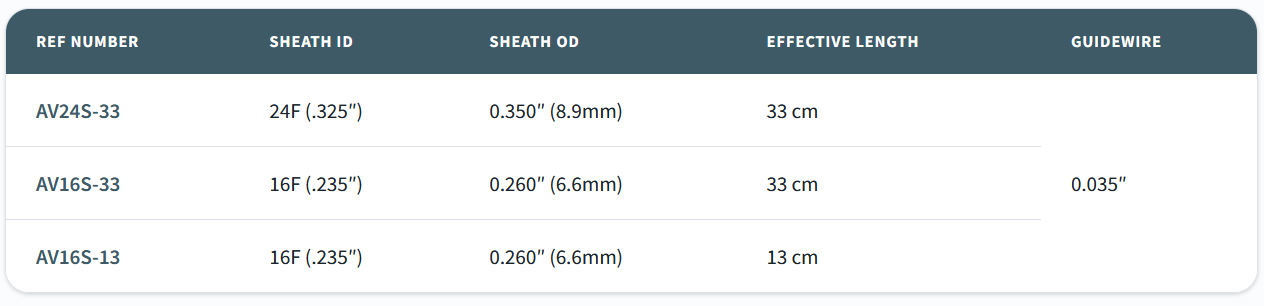
The Aventus Introducer Sheath is a percutaneous device that is inserted into the patient anatomy via standard venous access procedures. The Aventus Introducer Sheath is available in three (3) models differentiated by French Size and Working Length. (Table 1). The hydrophilic coated sheath is constructed with a flexible large-bore shaft and fitted with an atraumatic tip to create a seamless transition between dilator and shaft for ease of insertion and flexible navigation of anatomy at various access sites. The Aventus Introducer Sheath houses a user-actuatable valve for friction management associated with the insertion of larger bore catheters. The distal tip of the Aventus Introducer Sheath and the Aventus Dilator shaft are radiopaque to aid influoroscopic visibility.

The 0.035” guidewire compatible dilator assists during sheath insertion and positioning in the access vessel.


REF Number
Sheath ID
Sheath OD
Effective Length
Guidewire Compatibility

AV24S-33

24F (.325”)

0.350” (8.9mm)

33 cm

0.035”

AV16S-33

16F (.235”)

0.260” (6.6mm)

33 cm

AV16S-13

16F (.235”)

0.260” (6.6mm)

13 cm

Package Contents

Aventus Introducer Sheath

Aventus Dilator

Recommended Accessories

0.035″ (0.89 mm) guidewire

Sterile Heparinized Saline, 0.9%

Luer lock syringes

Warnings

Carefully read all instructions prior to use. Observe all warnings and precautions noted throughout these instructions. Failure to do so may result in complications.

Use before the “Use By” date specified on the product packaging.

Intended for single use only. Do not re-sterilize or reuse this device.  Reprocessing and re-sterilization increase the risks of patient infection and compromised device performance.

Contents are sterile and non-pyrogenic if package is undamaged or unopened. Do not use if package is opened or damaged. Examine each device before use to verify it is not damaged.Only physicians who have received appropriate training and are familiar with the principles, clinical applications, side effects and hazards commonly associated with vascular interventional procedures should use this device.

Should be used with fluoroscopic guidance and proper anticoagulation agents.

The Aventus Introducer Sheath should not be exposed to organic solvents.

Do not make any modifications to the system, including cutting to alter length. Alterations may impair device function.

Adequate vessel access is required to introduce the sheath into the vasculature. Careful evaluation of vessel size, anatomy, tortuosity and disease state (including calcification, plaque, and thrombus) is required to ensure successful sheath introduction and subsequent withdrawal. If vessel not adequate for access, major bleeding, vessel damage, or serious injury to the patient, including death, may result.

If vessel size is smaller than the introducer sheath outer diameter (Table 1), major bleeding, vessel damage, or serious injury to the patient, including death, may result.

Do not attempt sheath advancement or withdrawal without guidewire and dilator in place. Major bleeding, vessel damage or serious injury to the patient, including death, may result.

Ensure dilator is locked to Aventus Introducer Sheath during advancement. Advance dilator and sheath together with a twisting motion to avoid damage to the sheath and vessel.

Do not attempt to place a guidewire with a maximum diameter greater than 0.035” (0.89mm) through the dilator.

Do not attempt to advance or withdraw guidewire, catheter, or device through the introducer sheath if resistance is felt. Use fluoroscopy to determine the cause. Continued advancement or retraction against resistance may result in major bleeding, vessel damage, serious injury to the patient, or damage to/ breakage of the guidewire, catheter or other device.

Do not attempt to insert a catheter or interventional device having a diameter larger than the introducer sheath size (Table 1). Device damage or breakage may occur as a result.

Do not attempt to insert multiple catheters or interventional devices through the Aventus Introducer Sheath at once. Device damage or breakage may result.

Advance and remove sheath only under fluoroscopic guidance.

The Aventus Introducer Sheath should not be left in-situ beyond the intra operative period.

In the event of patient deterioration, remove the system.

Precautions

Failure to press Valve Actuation Button when inserting a device through the Introducer Sheath may damage the valve

Intended for use by physicians trained and experienced in percutaneous, intravascular, diagnostic, and interventional techniques requiring fluoroscopic visualization.

Ultrasound guidance should be used to ensure desired vessel target area is accessed during introducer sheath placement.

Verify sheath, device, catheter and accessory component size compatibility prior to use.

Flush each device with heparinized saline to purge all air prior to use.

Do not attempt to advance sharp objects/instruments through the Aventus Introducer Valve. Sharp object/ instruments could cause damage to the Aventus Introducer Valve and could result in major blood loss.

Use extreme caution in patients with previous thrombolytics as excessive manipulation may increase the risk of bleeding.

To ensure the blood in the flush line does not coagulate, blood that has dwelled in the system for 5 min should be flushed with heparinized saline through the flush port of the Aventus Introducer Sheath.

Individual patient anatomy and physician techniques may require procedural variations.

Contraindications

Not intended for use with power injectors.

Not intended for use without anticoagulation.

Not intended for use inif the sheath outer diameter (OD) exceeds the vessel diameter indicated for access.

Potential Complications /Adverse Events

Blood Loss, bleeding, Hematoma

Embolization (micro or macro) with transient or permanent ischemia

Infection

Vascular trauma (i.e. dissection, rupture, perforation, spasm, stenosis, etc.)

Death

Directions for Use

Preparation

Verify proper size introducer sheath is selected for the device to be introduced.

Verify the vessel is of adequate diameter and tortuosity to accommodate the AventusIntroducer Sheath. Ultrasound guidance should be used to ensure desired vessel target area is accessed during introducer sheath placement.

Remove the Aventus Introducer Sheath and Aventus Dilator from the pouch and examine contents for possible damage or defects. Transfer contents to the sterile field.

CAUTION: Do not use if damaged or defective.

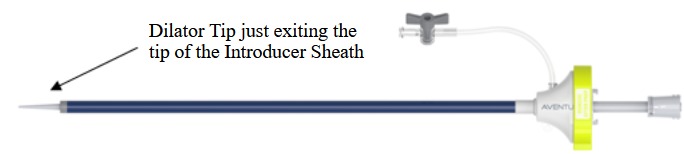
Insert the Aventus dilator into the Aventus Introducer Sheath and advance until distal tip of dilator is seen exiting the sheath. Do not fully insert – leave approximately 1”-2” sticking out of the back of the Introducer Valve housing.Refer to image below.

Fill a30-cc syringe with sterile heparinized saline and flush the Aventus Introducer Sheath through the flush port until saline is seen exiting the sheath. Close the stopcock before syringe disconnection.

Flush the Aventus dilator with sterile heparinized saline until saline exits the tip.

Disconnect the syringe.

Advance the dilator until the dilator hub runs into the back of the housing.

NOTE:Align marker on the Aventus Introducer Valve housing and “1” marker on dilator hubduring dilator advancement as shown.

Rotate the dilator90 degrees in the clockwise directionto lock in place.

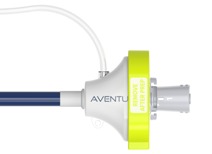
Remove green clip and verify alignment marker on the Aventus Introducer Valve housing should align with the “2” marker on the Dilator Hub.

Wipe down the exterior of the Aventus Introducer Sheath with a gauze pad dipped in heparinized saline to activate the hydrophilic coating.

Procedure

Follow accepted clinical practice for vessel puncture or incision and guidewire insertion.

Advance the sheath with the dilator as a unit over the guidewire under fluoroscopic guidance; do not allow dilator to back out of sheath while advancing. Advance the assembly in a twisting motion to avoid damage to the sheath and vessel until in desired location.

WARNING: Avoid using excessive force to advance or retract the Introducer Sheath. Excessive force against resistance may result in damage to the device or vessel perforation.

WARNING: Do not attempt advancement of the sheath without the dilator and guidewire in place.

Rotate the dilator in the counterclockwise direction to unlock from the Aventus sheath. Hold the sheath steady and maintain guidewire position while withdrawing the dilator from the sheath until it is completely removed.

NOTE: If valve does not fully close on guidewire upon dilator removal, press the valve actuation button to reset the valve. If the leak continues, replace the system.

NOTE:Keep the sheath assembly as straight as possible outside the body to prevent kinking of the assembly.

Advance the selected interventional device over the guidewire through the valve and into the sheath. Carefully support all guidewires, catheters and other devices while advancing through the Aventus Introducer Valve. Follow manufacturer’s recommendations for use of selected interventional device.

NOTE: Press valve actuation button upon insertion of any device > 5F

NOTE: Flush port can be used for saline/blood injections as needed in the procedure.

Upon removal of the sheath, precautions should be taken to prevent bleeding, vessel damage or other serious injury. Advancement of the dilator into the sheath prior to sheath withdrawal may aid in withdrawal of the sheath from the vasculature.

Storage and Handling

Keep dry and store at 0-35oC

Disposal

Dispose of all devices in accordance with applicable hospital administrative and/or local government policy.

Graphic Symbols Contained in Device

Consult Instructions for Use

Do not use if the sterile barrier or product is damaged.

CAUTION: Federal (USA) law restricts this device to sale by, or on the order of a physician

Lot Number

Single Use Only. Do not Re-Use

Keep out of sunlight

Contents of Package

Do not re-sterilize

Catalog Number

Use By

Non-pyrogenic

Manufacturer

Sterilized by EO

Keep dry

Recommended Guidewire Size

Warranty

Inquis Medical, Inc. warrants that reasonable care has been used in the design and manufacture of this device. This warranty is in lieu of and excludes all other warranties not expressly set forth herein, whether expressed or implied by operation of law or otherwise, including, but not limited to, any implied warranties of merchantability or fitness. handling, storage, cleaning, and sterilization of this device, as well as factors relating to the patient, diagnosis, treatment, surgical procedures, and other matters beyond Inquis Medical, Inc.’s control, directly affect the device. This warranty is limited to the repair and replacement of this device. Inquis Medical, Inc. shall not be liable for any incidental or consequential loss, damage or expense directly or indirectly arising from the use of this device. Inquis Medical, Inc. neither assumes, nor authorizes any other person to assume for it, any other or additional liability or responsibility in connection with this device. Inquis Medical, Inc. assumes no liability with respect to any devices reused, reprocessed, or re-sterilized and makes no warranties, expressed or implied, including, but not limited to, merchantability or fitness for intended use, with respect to such device. 

Price, specifications, and model availability are subject to change without notice. 

Inquis Medical, Inc
1530 O’Brien Dr, Suite A
Menlo Park, CA – 94025
USA
888.526.7738 | cs@inquismedical.com